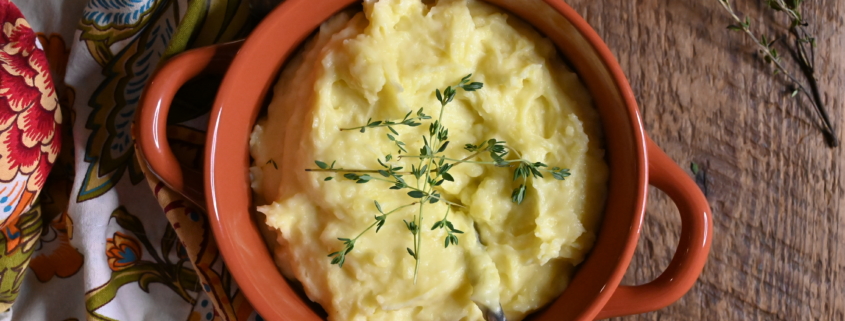
Tasty’s Ultimate Mashed Potatoes
Recipe Overview
I made Jody Tixier’s & Alexis Deboschnek’s Ultimate Mashed Potatoes from Tasty, and oh my! At first I wasn’t that impressed with them, but they aged well on me. Which is a weird thing to say about mashed potatoes! They are work; they aren’t for a Tuesday after work, school, and sports. But if you’re looking for a restaurant style mashed potato – this is it! Pro Tip – they were exceptionally delicious the next morning with a fried egg.
Ingredients List
Ingredients:
- 2lb yukon gold potatoes
- 1/2 cup whole cream
- 1/2 cup heavy cream
- 8 cloves garlic, crushed
- 1/2 cup unsalted butter, cubed, cold
- 2 tsp kosher salt
- freshly ground black pepper, to taste
- chives, finely chopped, for serving

Step 1: Prep the Potatoes
On a cutting board, peel the potatoes. Place the potatoes in a large bowl of cold water after peeling to avoid discoloration. Cut the potatoes into 1-inch cubes. Add the potatoes to a large pot and cover with cold water. Bring to a boil over high heat, then reduce the heat to low and simmer for 12 minutes.

Step 2: Prep the Cream
In a small saucepan, bring the milk, heavy cream, and garlic to a simmer over low heat. Remove the pot from the heat and strain the cream through a fine mesh sieve.

Step 3: Mash the Potatoes
Drain the potatoes in a colander and transfer back to the pot.
Mash the potatoes with a potato masher, potato rice, or by pushing through a fine mesh sieve with a spatula.
NOTE: I used a shredding attachment for my mixer and it worked great. I made these a second time and used a potato masher and they were not as good – the masher left chunks and the potatoes just weren’t as creamy. Stick with the ricer or shred the potatoes.

Step 4: Mix the Potatoes and Cream
Add the cubed cold butter and salt to the potatoes. Stir to combine. Gradually add the cream mixture to the potatoes, little by little, until fully incorporated.
Top with freshly ground black pepper and sprinkle with chives. Enjoy!
Conclusion
If you watch the video, you can see that I wasn’t impressed with these mashed potatoes on first blush. But after the cameras stopped rolling, and the potatoes aged a little bit, I whole heartedly changed my mind. And truthfully, the next morning they were even better. Note: this made an insane amount of mashed potatoes so we ate them for breakfast & lunch for two days. It is not 4 servings, unless you’re serving giants.


Fox and Briar’s Creamy Basil Skillet Pork Chops
Recipe Overview
Pork chops can be finicky. And by finicky, I mean tough and unappetizing. But these, These! The Creamy Basil Skillet Pork Chops from Fox and Briar might be some of the best pork chops I’ve ever made. And they were simple. My favorite. These are a weeknight meal that will feed the whole family. Actually, I’m making them tonight!
Ingredients List
Ingredients:
- 1 pounds thin boneless pork chops
- 3 tablespoons butter
- 4 large garlic cloves minced
- 1/2 yellow onion finely minced
- 3-4 ounces roasted red peppers thinly sliced
- 1/4 teaspoon paprika
- 1 1/2 cups heavy cream
- 1 cup packed fresh basil leaves plus more for garnish
- 1 cup fresh grated parmesan
- 1/4 teaspoon crushed red pepper flakes
- 1/2 cup white wine or chicken stock
- salt to taste
- black pepper to taste

Step 1: Sear the Pork Chops
In a large non stick pan on medium-medium high heat, melt 2 tablespoons butter. Season pork chops with salt and pepper, then sear, 4-5 minutes on each side, until just cooked. Remove from the pan and set aside.

Step 2: Sauté the Onions
In the same skillet add 1 tablespoons butter. Add onion, garlic, peppers, paprika, red chili pepper flakes, salt and pepper. Sauté for about five minutes, until onions and peppers are softened.
Add wine to deglaze the skillet and bring to a gentle simmer until reduced by half.
NOTE: I left out the peppers for dietary reasons, although I’m sure it’s delicious with them!

Step 3: Add the Cream
Reduce heat to medium low. Add cream to the skillet and stir until a creamy sauce forms. Add Parmesan, stir until melted into sauce. Taste sauce and adjust seasoning with salt and pepper if needed. Stir in basil, simmer until wilted, 1-2 minutes.

Step 4: Add Pork Chops
Add pork chops back to the skillet, allow to warm up if needed. Serve.
Enjoy!
Conclusion
If you’ve ever shied away from pork chops because they inevitably turn into hockey pucks, then let this recipe be your guide. Fox and Briar have given us (me and you!) a weeknight winner. Actually, as I was sitting in my home office working on this, the 9-year-old said “oh…those were good!” And that’s all you need to know!

Leave a Comment
Family Treasury of Jewish Holidays’ Latkes
Recipe Overview
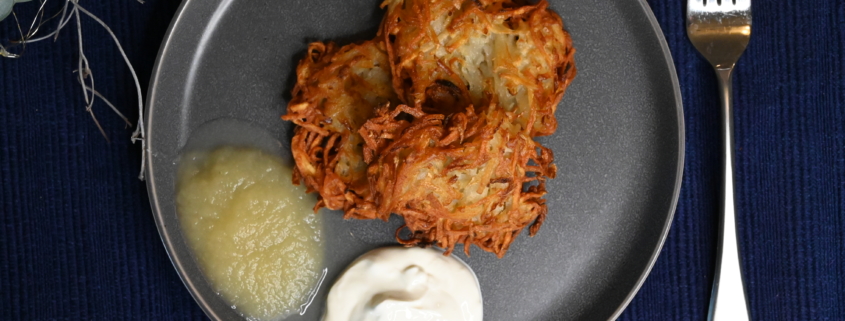
Why mess with tradition? These traditional latkes by Malka Drucker in her Family Treasury of Jewish Holidays book are all you need for the most delicious, crispy and “make it feel like home” latkes.
Ingredients List
Ingredients:
- 3 large Russet potatoes
- 1 small onion
- 2 beaten eggs
- 2 tbsp flour
- 1 tsp salt
- Pinch of pepper
- ½ cup vegetable oil

Step 1: Prep the Potatoes and Onions
Wash the potatoes (there is no need to peel them). If you have a food processor, use the shredding disc to grate the potatoes and onions. If you don’t have a food processor, you can use a hand grater but be prepared for a workout.

Step 2: Mix the Latkes
Add the beaten eggs, flour, salt, and pepper. Let the mixture sit for 10 minutes to thicken. Pour off the excess liquid.

Step 3: Fry the Latkes
Heat the vegetable oil in a frying pan for one minute. Adjust the amount of oil in the pan so that there is enough to cover the bottom of the pan, but not enough to submerge the latkes.
Gently drop about 2 tbsp of potato mixture into pan. You can flatten it softly with your tongs or spatula. When the latkes are brown around the edges (it’s going to be a few minutes), flip them gently and fry the other sides until crispy. Drain them on paper towels. Serve with applesauce and sour cream.
Conclusion
I had never eaten a latke until I met my husband, but now on 20 years (wow, we’re old) they are one of my favorite recipes. There is no need to go to extraordinary lengths with your latkes – simple ingredients allow the flavors to shine.

Leave a Comment
Bon Appetit’s Best Green Bean Casserole
Recipe Overview
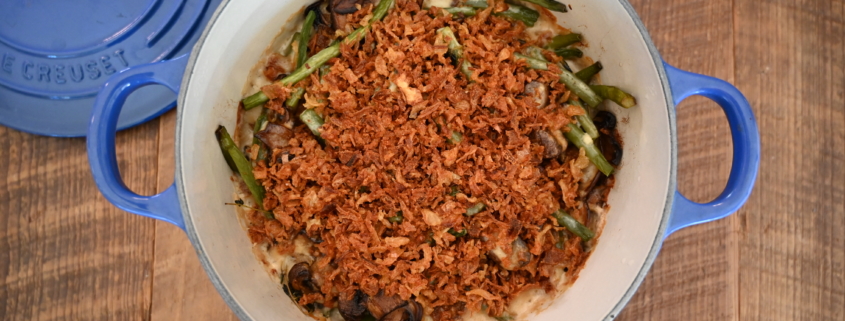
This is not a quick side dish. It’s a process. It’s from scratch. And it tastes like it. So, if you want some really good green bean casserole, make BA’s Best Green Bean Casserole.
Ingredients List
Ingredients:
- 2 pounds green beans
- Salt & Pepper
- ¾ cup fried onions
Mushrooms
- 1 pound cremini mushrooms, sliced & divided
- 4 tbsp unsalted butter, divided
- 4 large sprigs thyme
Béchamel
- 2 tbsp all-purpose flour
- 2 tbsp unsalted butter
- 1 ¼ cups whole milk
- 1 cup heavy cream
- 4 garlic cloves, finely grated
- ½ cup parmesan

Step 1: Cook the Green Beans
Preheat oven to 375°. Working in batches, cook green beans in a large pot of boiling salted water until bright green and half way to tenderness, about 3 minutes per batch. Drain and let cool; trim stem ends.
NOTE: I made this a second time and trimmed the ends before we cooked the green beans. I found it substantially easier to trim the uncooked beans and it didn’t make any difference in the dish.

Step 2: Cook the Mushrooms
Heat 1 Tbsp oil in a large skillet over medium-high heat. Cook half of mushrooms, without stirring, until golden brown underneath, about 2 minutes. Toss and continue to cook, tossing occasionally, until browned on both sides, about 3 minutes more. Add 2 Tbsp butter and 2 thyme sprigs to pan. Cook, tossing occasionally, until butter browns and mushrooms are dark brown and very tender, about 4 minutes longer. Season with salt and transfer to a plate. Repeat with 2 tbsp butter, salt, and remaining oil, mushrooms, and thyme.

Step 3: Make the Béchamel
Melt remaining 2 Tbsp of butter in a large saucepan over medium-low heat. Whisk in flour and cook, whisking occasionally, until roux golden brown and smells mildly nutty, about 4 minutes. Whisk in milk and cream. Increase heat and bring to a simmer, whisking often, and cook until bechamel sauce is thick and bubbling, about 5 minutes. Remove from heat and whisk in garlic and Parmesan; season with salt and pepper

Step 4: Assemble and Cook
Arrange green beans and mushrooms in a 2 quart baking dish. Pour sauce over (it may not look like enough, but it will get softer as it bakes). Cover tightly with foil and bake until sauce is bubbling, 25 to 30 minutes. Uncover and continue to bake until casserole is lightly browned on top and around the edges, 15 to 20 minutes longer. Top with fried onions and continue to bake just until onions are slightly darker and fragrant, about 3 minutes. Let sit 10 minutes to set before serving.
NOTE: I just layered the green beans, then mushrooms, then poured the sauce on top because I didn’t know what “arrange” meant. It worked fine!
Conclusion
This recipe ended with me shoveling green bean casserole out of the baking dish and into my mouth. My whole family quickly joined me. I guess that’s all you really need to know about this one. Lol. So long as you have the time and are willing to do a fair amount of dishes, this one is a keeper!

Leave a Comment
Minny’s Chocolate Pie
Recipe Overview
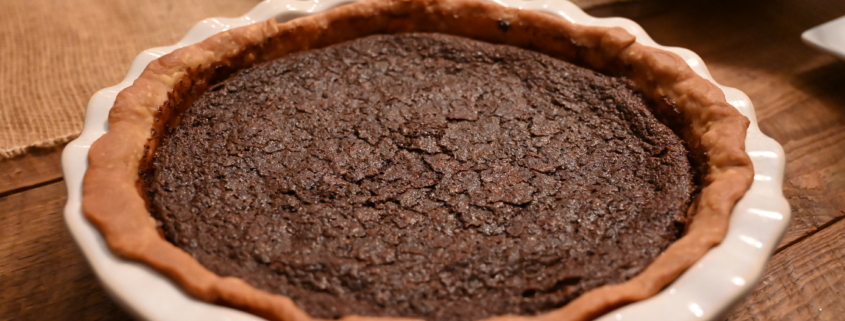
Yes, yes and yes!!!! Minny’s Chocolate Pie from Lee Ann Flemming and Food & Wine is super easy and super delicious. It’s the holy grail of baking. I was unusually uncomfortable making this pie, but in the end I had nothing to worry about. It’s a showstopper. My family demanded it again the following week, to which I wholeheartedly obliged!
Ingredients List
Ingredients
- 1 packaged pie dough crust, such as Pillsbury (or you can make your own)
- 1 ½ cups sugar
- 3 tbsp unsweetened cocoa powder
- 4 tbsp unsalted butter, melted
- 2 large eggs, beaten
- ¾ cup evaporated milk
- 1 tsp pure vanilla extract
Whipped cream, optional for serving

Step 1: Make the Crust
You can follow these instructions for a packaged die dough, or if you make your own pie crust follow the instructions for a partially baked crust.
Preheat oven to 350o. Ease the pie crust into a 9-inch pie plate and crimp the edges decoratively. Prick the crust lightly with a fork. Line the crust with foil or parchment paper and fill with pie weights or dried beans. Baked for 15 minutes or until set. Remove the foil and weights and bake for about 5 minutes longer, just until the crust is dry but not browned.

Step 2: Make the Filling
Meanwhile, in a bowl, whisk the sugar with the cocoa powder, butter, eggs, evaporated milk, vanilla, and salt until smooth.
NOTE: On my first bake, I did not whisk the dry ingredients together which resulted in a mixture that had specks of cocoa and whatever else that wouldn’t break up. On my second bake, I did whisk and there weren’t any specks. It did not affect the end result though!

Step 3: Prepare the Pie
Pour the filling into the pie shell and bake for about 45 minutes, until the filling is set around the edges but a little jiggly in the center. Cover the crust with strips of foil halfway through baking. Transfer the pie to a rack and let cool completely before cutting into wedges. Serve with whipped cream, if you like.
NOTE: You can refrigerate the pie overnight.
Conclusion
Make it! If you can swing your own crust, do it, otherwise this recipe is the absolute best of all the worlds. Simple and yummy. Two of my favorite things. Which means this will be one of your favorites things after you make it! Enjoy!

Leave a Comment
Smoked Turkey
Recipe Overview
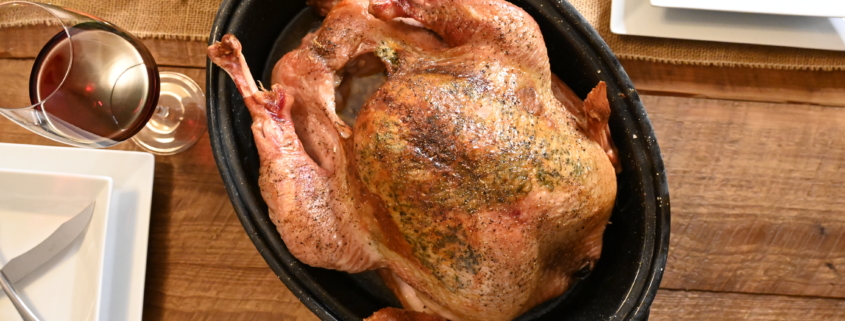
If Traeger were my kid, it would be in deep trouble for the complete lack of effort put into this recipe. I mean, I’d grade it a D at best. The written recipe is woefully inadequate, with the video expanding tenfold the steps needed to complete a Traditional Smoked Turkey. Luckily, I figured this out before I turned my Smoked Turkey into a hockey puck. Annoyingly, actually smoking the Turkey correctly yielded a deliciously moist dinner. But the sins of Traeger’s written recipe shall not be forgiven because I’m sure they’ve ruined someone’s Thanksgiving.
Ingredients List
Ingredients:
-
- Turkey – size is up to you. Think 1lb per person.
- For the Brine
- ½ cup salt
- ½ cup sugar (white or brown)
- You may add anything else such as garlic, leeks, apple cider, bay leaves, orange peel, sage, rosemary….the list is endless. Or you can just use salt and sugar, which is what I do.
- For the Turkey Butter
- ½-1 Pound butter
- 6 Cloves garlic, minced
- 8 Sprigs fresh thyme
- 1 Sprig fresh rosemary
- 1 Tbsp cracked black pepper
- 1/2 Tbsp kosher salt
- Olive Oil, plus salt and pepper to taste
- Chicken Stock
Step 1: Brine the Turkey
Boil sugar and salt in 2 cups of water until both dissolve. Transfer brine to a pot big enough to submerge your turkey in water. Do not put the turkey in hot water. Put cold water in the pot and wait until the water is cold if you have to. Submerge turkey in brine for 6-24 hours (think day before) in the refrigerator.
NOTE: I can a lot of jelly – your water bath canner works great for brining your turkey.

Step 2: Prep the Turkey
In a small bowl, combine softened butter with minced garlic, thyme leaves, chopped rosemary, black pepper and kosher salt. Depending on the size of your turkey you may increase or decrease the amounts in this step – more butter makes things taste better.
Prep the turkey by separating the skin from the breast creating a pocket to stuff the butter-herb mixture in. Spread the butter mixture between the breast meat and the skin. If you’re not sure how to do this, watch the video.
Paint the entire turkey with olive oil and salt & pepper. NOTE: there is no basting in this recipe so the salt & pepper will stay in place and you’ll get a mouthful of it with the skin. This made me use less than I would on a baked turkey.
Place the turkey in a roasting pan on a rack with chicken stock and the neck in the bottom of the pan. I used about 2 cups of stock, but this is your preference and dependent on the size of your pan and bird.
Step 3: Prep the Smoker
Set the grill temperature to 300℉ and preheat, lid closed for 15 minutes.

Step 4: Cook the Turkey
Place turkey on the grill and smoke for 3-4 hours. Check the internal temperature, the desired temperature is 175℉ in the thigh next to the bone, and 160℉ in the breast. Turkey will continue to cook once taken off grill to reach a final temperature of 165℉ in the breast.
NOTE: a 17lb turkey took more than 4 hours. While Traeger seems to think that cooking time doesn’t increase with bird size, experience tells me that it does. A 12lb turkey took 3:45. A 17lb turkey took 4:15 but we pulled at 160. A friend’s 20lb turkey was raw at 4 hours and had to go in the oven.
Conclusion
Smoked Turkey is great, just don’t follow Traeger’s instructions. Which is super irritating to be honest. My oven was free all day, allowing me space to make all of my other concoctions. That is significant upside value. The turkey is moist, crispy, and delicious with a delectable smokey flavor that transmits to your gravy too!

Leave a Comment
Everything Bagel Cheese Ball
Recipe Overview
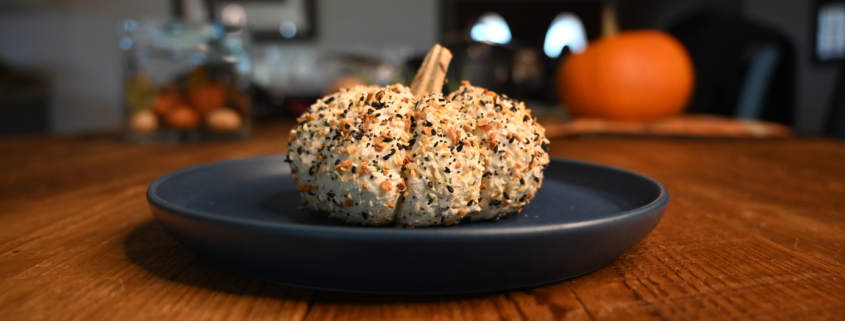
First off, it looks just like the picture and it’s adorable!!! Point scored. Second, it was easy to make. Point scored. Third, it’s too much horseradish. Point lost. (Insert sad face here) Delicious Table’s Everything Bagel Cheese Ball, more aptly named the Everything Bagel Pumpkin Cheese Ball, is as festive as appetizers get and will look fantastic on your holiday table. But you’ve got to cut the horseradish to make this a repeat recipe. In real life, there’s just too much tang to make it really appetizing. I’ve incorporated the tweaks below – just keep in mind that you should incorporate as much horseradish as you prefer.
Ingredients List
Equipment Needed:
- 4 – 24” lengths of String (butcher, twine, whatever you have laying around that is a bit thicker)
- 1 Stem – can be from a small sugar pumpkin, butternut squash, zucchini, or any other stemmed vegetable. You can substitute celery if you can’t get a stem.
Ingredients:
- 8oz Cream Cheese (1 package) softened, room temperature
- 4 tbsp Everything Bagel Seasoning divided 2 tbsp & 2 tbsp
- ¼ cup sour cream
- 2 tsp prepared horseradish – you may omit this. 2 tsp made this inedible for my family (and my husband loves horseradish) so adjust for your family. We’d leave it out entirely next time.
- 2 tsp Worcestershire sauce
- 1 cup Sharp Cheddar shredded
- 2 tbsp fresh chives or green onions
- 1 bag pita chips, crackers, or vehicle of your choice
Step 1: Prepare Your Pumpkin Stem
I used a butternut squash stem that popped off quite easily. Delicious Table suggests cutting the top off of your squash and then using a knife to cut the extra pumpkin from around the stem. She says not to try to pull it off because it will usually break, so use your judgment here.
Step 2: Make the Cheese Ball
In a medium bowl, mix softened cream cheese, 2 tbsp Everything Bagel Seasoning, sour cream, horseradish (if using), Worcestershire sauce, cheddar cheese, and fresh chives. Using a rubber spatula, mix and form a round ball in the bowl.
NOTE: this was a shoulder and forearm workout! I’d use a mixer with the paddle attachment next time. Just be judicious and don’t beat it into oblivion.

Step 3: Wrap the Cheese Ball
Place a large sheet of plastic wrap on the counter and set the cheese ball in the center. Wrap the cheese ball tightly with the plastic wrap. I twisted the top to secure and that worked just fine.


Step 4: Form the Pumpkin
Lay the 4 pieces of string in a star pattern on the counter. Place the wrapped cheese ball in the center. Tie each string tightly enough to create impressions in the cheese ball. Chill in the refrigerator for at least 2 hours, or overnight.

Step 5: Finish the Pumpkin
Get ready to sprinkle your pumpkin with Everything Bagel Seasoning. Cut the strings and discard. I unwrapped the top while holding the cheese ball and sprinkled seasoning around the edges and top. It’s super sticky, so don’t set it down until you’re absolutely ready. Seasoning is gonna kinda go everywhere so you might consider placing a cookie sheet under the pumpkin while you’re sprinkling to catch wayward bits. Once you have enough seasoning on the sides, place your cheese ball where you want it – it’s not easily moved so place with intention. Place your stem and enjoy what you’ve created!
Conclusion
This Everything Bagel Cheese Ball is a delight to the eyes and festive to the core! With a little bit of adjustment on the horseradish level, this is a winner every time. Cute, easy, and tasty. It doesn’t get any better than this! In real life, this recipe works!

Leave a Comment

Pumpkin Deviled Eggs
Recipe Overview
Ummmmm, put these in the fail category. Good idea, but it didn’t work out at all! Which I was super bummed about, because they looked so cute on Kathryn’s recipe card. I’ve made approximately a million deviled eggs in my life and thought I’d pretty them up using this recipe. It was too wet and I couldn’t get them to look like pumpkins at all. I’ll stick with my dijon mustard next time! In real life, these just didn’t make the cut.
Ingredients List
- 6 hard boiled eggs
- 2 tsp yellow mustard
- ¼ cup mayonnaise
- Salt and pepper to taste
- Chives (chopped)
- Paprika or red cayenne pepper (optional)

Step 1: Prep the Eggs
Peel the hard boiled eggs and slice lengthwise. Separate the yolks from the whites.

Step 2: Make the Filling
Mix yolks, mustard, mayonnaise, salt and pepper together in a bowl.
NOTE: We all prefer dijon over yellow mustard. Use your preference. If you want to try to make these into pumpkins, I’d leave the mayonnaise out until the end and add a little at a time until you get a consistency that will allow you to impress the lines.

Step 3: Scoop and Roll it Until it is Round
Scoop about 2 tsps of the mixture into a spoon and roll it until it is round. Place in an egg white and press the yolk mixture down with your fingers to fill the egg white.
NOTE: I didn’t get mine to do this. It was way too wet.

Step 4: Make 3 to 4 Indents
Using the back of a knife, make 3-4 indents in the yolk mixture to resemble pumpkin sections. Top with a ¼-½ inch chive. Sprinkle with paprika or cayenne if you prefer.
Conclusion
This recipe had lots of 5-Star reviews, which is why I tried it. Honestly, I can’t see how. Skip this one and use your tried and true deviled egg recipe. I’ll keep looking for one that tastes good and gives us all the cuteness of Fall.

Leave a Comment
Awesome and Easy Creamy Corn Casserole
Recipe Overview
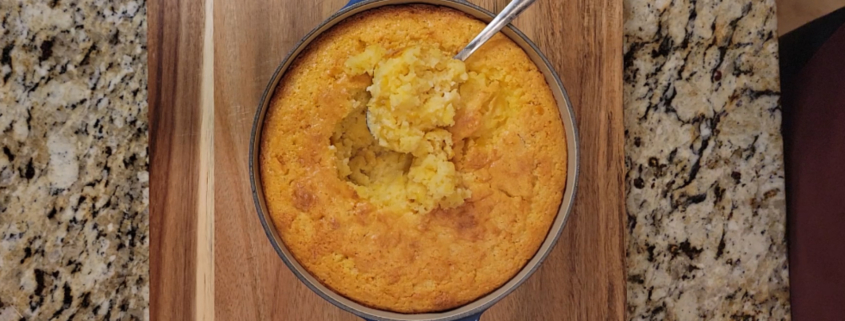
Descriptive names that actually describe the product and result?! A seemingly unheard of accomplishment in the land of internet recipes has finally been tackled. LETSGGGO’s Awesome and Easy Creamy Corn Casserole is both Awesome and Easy! It’s soooo simple and just this morning my husband was reminding me how good it was. Seriously, put the kids in charge of making this holiday side dish and free yourself up for the more complicated tasks.
Ingredients List
- ½ cup butter, melted
- 2 eggs, beaten
- 1 (8.5oz) package dry corn bread mix (I used Jiffy)
- 1 (15oz) can whole kernel corn, drained
- 1 (14.75oz) can creamed corn
- 1 cup sour cream

Step 1
Preheat oven to 350oF. Lightly grease a 9×9 baking dish.

Step 2
In a medium bowl, mix melted butter, eggs, corn bread mix, whole corn, creamed corn, and sour cream. Spoon mixture into prepared dish.

Step 3
Bake until the top is golden brown.
NOTE: The original recipe called for 45 minutes. Granted I used a round dish, but it is pretty similar in size to a 9×9. At 45 minutes the top wasn’t golden brown and the insides were still liquid. I had to bake for an additional 25 minutes before mine was cooked through for a total baking time of 70 minutes. Take a look at the video for a good indication of the coloring to indicate it has cooked through.
Conclusion
With a slight adjustment for cooking time, this Awesome and Easy Creamy Corn Casserole gives you all the things you want in a side dish. Ease. Little prep. And ultimately, deliciousness that everyone will eat. Put this in your rotation for Summer, Fall, and Winter.

Leave a Comment
Instant Pot Pot Roast
Recipe Overview
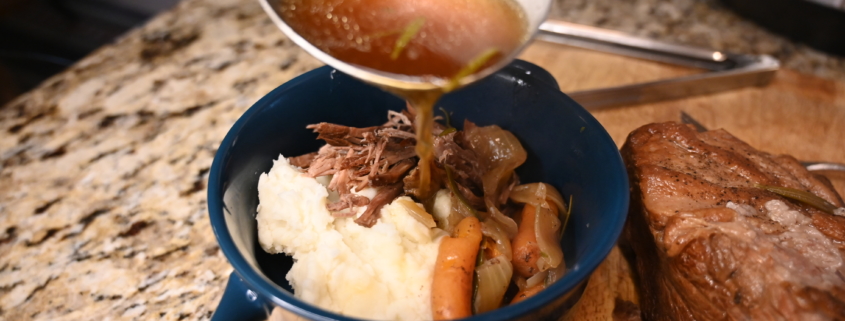
Did you forget to put the roast in the crock pot before you left for work at 7:45am? Because who hasn’t?! But the kids were at school on time, so put today in the win column and give yourself a break. Pioneer Woman’s Instant Pot Pot Roast is the ticket to your dinner. It’s easy, and mostly quick, so pop it in before you head out for soccer and come home to dinner, done. The real trick here is that this recipe is good enough for a Sunday dinner, too.
Ingredients List
- 1 whole beef chuck roast, 3 to 4 pounds
- Kosher salt
- Black pepper
- 2 tbsp. olive oil
- 2 whole large yellow onions, peeled and quartered
- 6 whole carrots, washed, scrubbed, and cut into large pieces
- 1 cup red wine
- 2 cup beef stock
- 3 sprigs fresh rosemary
- 3 sprigs fresh thyme

Step 1: Prep the Pot
Set the Instant Pot to “Saute” and allow to warm. Depending on your model, it will read “Hot” or otherwise indicate it is ready.

Step 2: Prep the Roast
Season roast with salt and pepper. Add the olive oil to the Instant Pot and seat roast on all sides until browned. Remove to a clean plate.
NOTE: you can prep your carrots and onions while the roast is searing.

Step 3: Cook the Veggies
Add onions and carrots to the pot and cook for 3-4 minutes, stirring occasionally. Deglaze with red wine, making sure to scrape the bottom to get all the delicious bits. Add in the beef stock, rosemary, thyme, and the roast.

Step 4: Cook the Roast
Lock the lid and cook the roast on Manual/High for 1 hour 20 minutes. Allow time for the pot to naturally release – see Note below.
NOTE: Pioneer Woman suggests allowing no less than 10 minutes, preferably 20 minutes for the roast to naturally vent after it is done cooking. I did 20 minutes and the center was still not fork tender. My experience is to allow the natural venting process to complete itself (i.e. never hit the quick release button) if you want your meat (chicken, roast, etc.) to be tender and shreddable all the way through.
Conclusion
If you simply don’t have the time (or let’s be real, sometimes the patience) for an all day slow cook on a pot roast, then this recipe delivers the next best thing. It’s so close to a low and slow result that your family and guests will never tell the difference. In real life, friends keep this kind of secret. I’m not telling anyone!

Leave a Comment